 Drywall Taping Step by Step
(With tips the pros will never tell you)
For most do-it-yourselfers, the least exciting part of a renovation project is doing the drywall—and specifically taping the seams and joints. But that’s only because most DIYers don’t know the tricks of the trade or understand how the right materials, tools, and techniques can make it easier.
That ends now.
I’m here to walk you through this very important part of your drywalling project. You’ll want to pay special attention to these taping tips because they are going to totally change how you approach this part of the project. Proper taping will make your drywall look like it was hung by a pro!
Check out my other articles on drywalling:
 One of the reasons people typically dread drywalling is because it’s extremely time-consuming and taping is one reason why. In fact, 90% of the cost of a professional drywalling is labor, so taping your walls yourself can save you hundreds or even thousands of dollars, even on small jobs. Taping your wall correctly will also reduce the amount of sanding you’ll have to do (which is awesome), and it will make your walls look outstanding!
One of the biggest reasons drywall projects don’t turn out well is because people overlook the importance of taping. Taping is actually one of the single most important parts of any drywalling project, because it hides the seams and joints. If you choose to skip the drywall tape and just use joint compound to fill the seams, the ugly truth is the seams will become visible again after the compound dries. That can be frustrating, even more time-consuming (because you’ll obviously need to redo it), and frankly, embarrassing.
So, let’s get to it, shall we?
Before you get started, it’s important to make the right choice when it comes to the tape you use. There are a few choices when it comes to join tape, but I really only recommend you choose between two (and frankly, just one).
When you are getting the area ready, make sure you are ready as well! Wear a hat and protective eyewear (drywall compound can really hurt your eyes and it stings like crazy), and old clothing that you can toss when you’re done. Remove furniture from the room, and be sure to cover the floor with a canvas drop cloth.
So, are you ready to get to it? Now that you’re armed you with the materials you’ll need, the best tools to use, and the type of tape you want, it’s finally time to start taping some drywall!
Prefill gaps from top to bottom with setting compound. Setting-type compound is my preference for prefilling because it hardens quickly and doesn’t shrink as much as regular joint compound. Don’t mix too much though! Like I said, setting compound hardens quickly, and if you mix too much, you’ll wind up wasting a lot of it. If you prefill the gaps and let it dry before you apply the tape coat, the compound in the gaps will not negatively affect the tape. When it has hardened, but is not yet completely dry, scrape off peaks and lumps with a taping knife.
PRO TIP #1: Before applying the setting compound, break or cut off any broken or crumbling areas of the drywall, then remove any bits of paper left around the edges (peeling it away works best). This will make the prefill application smoother.
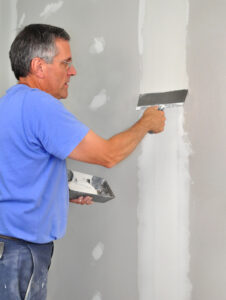
Apply the first coat of compound. I recommend using an all-purpose, heavyweight, drying-type joint compound for embedding paper tape. The heavyweight, all-purpose material (the original type of all-purpose compound) is stronger than lightweight or other weight compounds. I like covering the butt joints first, and highly recommend turning your taping knife sideways to apply the compound. That way you get just enough on the knife and there is less chance of excess compound running down the wall.
PRO TIP #2: If you’re using pre-mixed mud right out of the box, you’ll notice that it’s pretty thick—like cookie dough. Trying to run mud of that consistency into a straight line, or worse, a corner, is next to impossible. It’s thick because it lacks moisture, which makes it more difficult to bond to the tape, causing bubbles to form. If you thin out the pre-mixed mud with water until it’s about the consistency of soft-serve ice cream, the application will be much easier. This may seem counter-intuitive (because it’s pre-mixed, after all), but think of it like frozen juice concentrate. You buy the concentrate at a certain consistency, and then you water it down until it’s your desired consistency. It’s no different with joint compound.
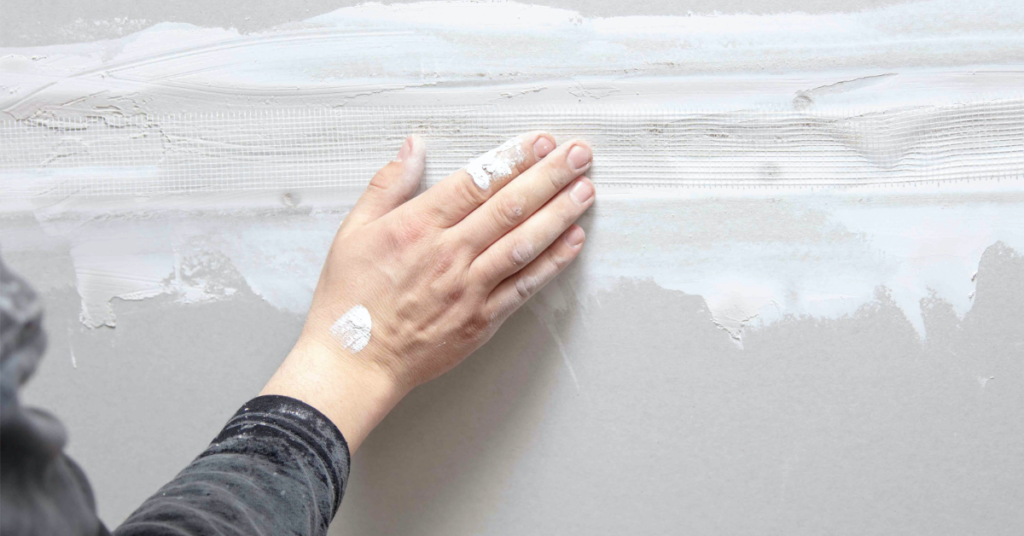
Embed the tape. This is the single most important part of the drywall process. Some people think that the sanding or the finishing coats are most important, but if you get the tape embedded properly in joint compound to begin with, you create a strong foundation. Once the compound has been applied, center the tape over the seam.
PRO TIP #3: This is one tip that no professional will ever tell you (except me). Remember how I said you need to have sufficient moisture to make sure a proper bond forms between the compound and the tape? Try dipping the tape in water and then squeezing the excess water out between your index and middle fingers. Moistening the tape will allow the bond between the tape and the mud to form more quickly. This is less of an issue in humid climates, but it makes an enormous difference just about everywhere else.
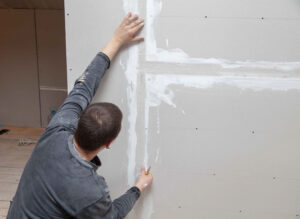 Press the end of the paper tape into the compound. Use your hand at one end of the seam and center it over the rest. Press it lightly into the compound every 18 inches or so to hold it in place. The tape has to be kept tightly pulled as it is centered over the joint. Once the end of the seam is reached, the tape can be cut. If you are taping seams close to the floor, use a vertical motion to push out any bubbles from the floor to the end of tape to avoid getting compound on the floor (or your shoes—ugh).
PRO TIP #4: Be very careful when using your knife to smooth out the tape! You don’t want to use too much pressure. Doing so can cause bubbles to form, because you’ll end up squeezing out too much compound. Also, despite what you might see on the Interweb, it’s OK to cut the tape into smaller sections using your drywall knife. Most pros will show you one full-length piece of tape covering the entire length of the wall, and while that’s ideal, it’s not a necessity. In fact, if you’re new to drywalling, trying to run a full-length piece of tape along a wall can quickly become a mess of wasted tape and dried compound. Just TRY embedding tape into dried-up compound! Go ahead … I’ll wait.
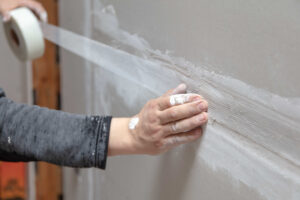
Cut the tape at the end of the seam. Push the edge of the blade tight into the compound with your taping knife, then pull the tape across the blade, tearing it crisply. When you are taping an entire wall, start wiping with the knife in the middle and work your way out to the corners.
Tape the corners.
 Apply two more coats of compound (at least). The first coat of mud is the tape coat, then comes the filler coat, and lastly, the third and final coat. Keep in mind that the tape actually should show through the filler coat. If it doesn’t, that means that your filler coat is too thick. Covering the tape comes only with the final 2 coats. If your first final coat doesn’t cover the tape, apply more coats, but keep them thin.
Pro-Tip #5: Be sure to use a topping compound instead of the normal mud when you do the final (third) coat. Topping compound is typically creamier/smoother, and sands easier. This makes for less work when you’re finishing the final coat and who doesn’t want less work at this point?!
Even if you follow each step perfectly, there are issues that can arise when you are taping drywall. You might not like the finished look, and even though you may not be thrilled about it, there are some things you can do to fix what you don’t like. Here are some common issues you might see after finishing your drywall project (and how to fix them):
This is one of the most common issues new drywallers face. The main reason air bubbles form under drywall tape is improper installation and/or an inadequate bond between the drywall compound and the drywall tape. You’ll need to fix the air bubbles before finishing the joint, because ripples in the tape that are left unfixed will be glaringly apparent after the wall is painted.
Here’s how you can fix the unsightly air bubbles:
Butt joints are difficult, even with paper tape. The biggest mistake with butt joints is too much mud under the tape. This creates a hump that is hard to hide with all the thin final coats. Applying some pressure to the knife when smoothing the tape out over the initial layer of mud helps to squeeze excess mud from behind the tape.
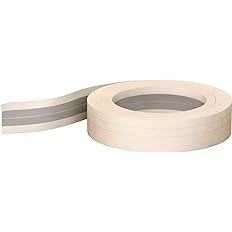
Even with paper tape, you can run into trouble on the inside corners. One remedy you can try is metal-reinforced corner tape. It combines a metal angle with paper flanges for a perfectly shaped and smooth inside corner. The metal also gives your drywall knife a smooth, rigid surface to ride along when taping the corner. I don’t recommend metal-reinforced tape for the entire job, but it works well for taping corners.
Drywall tape showing through the mud
Did you remember that it’s three coats of mud (at least) that you need? If this problem occurs even after applying the third coat, make sure your mud is thin (but not runny) and try again.
Hopefully, this step-by-step guide helps you tackle your next DIY drywall taping project like a pro. Again, doing it yourself will save you hundreds, if not thousands, and we could all use a little more jingle in our pockets.